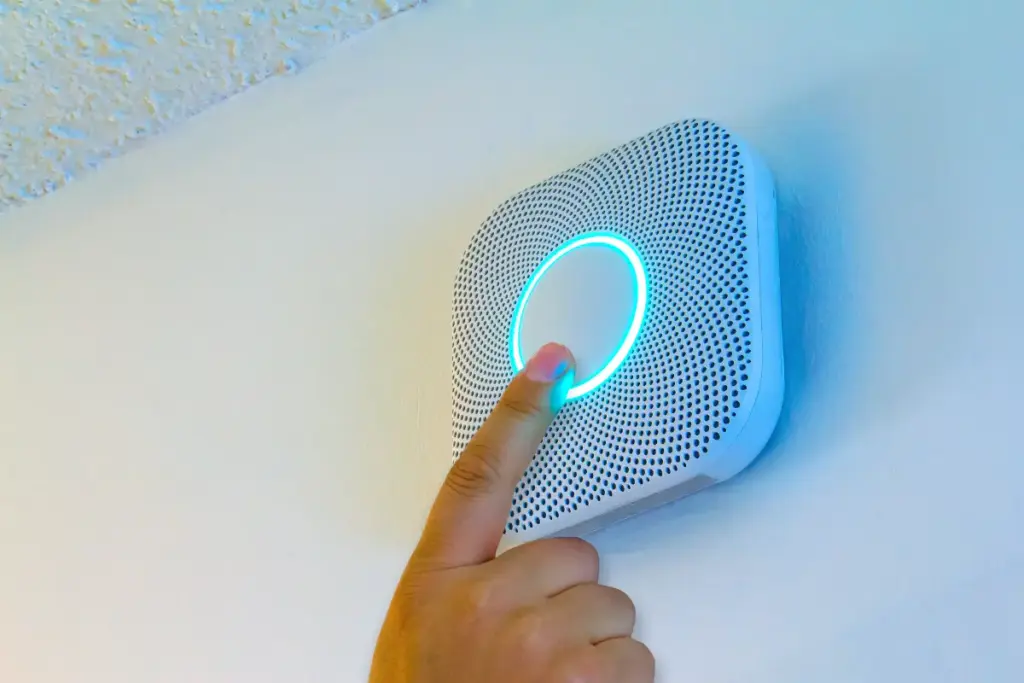
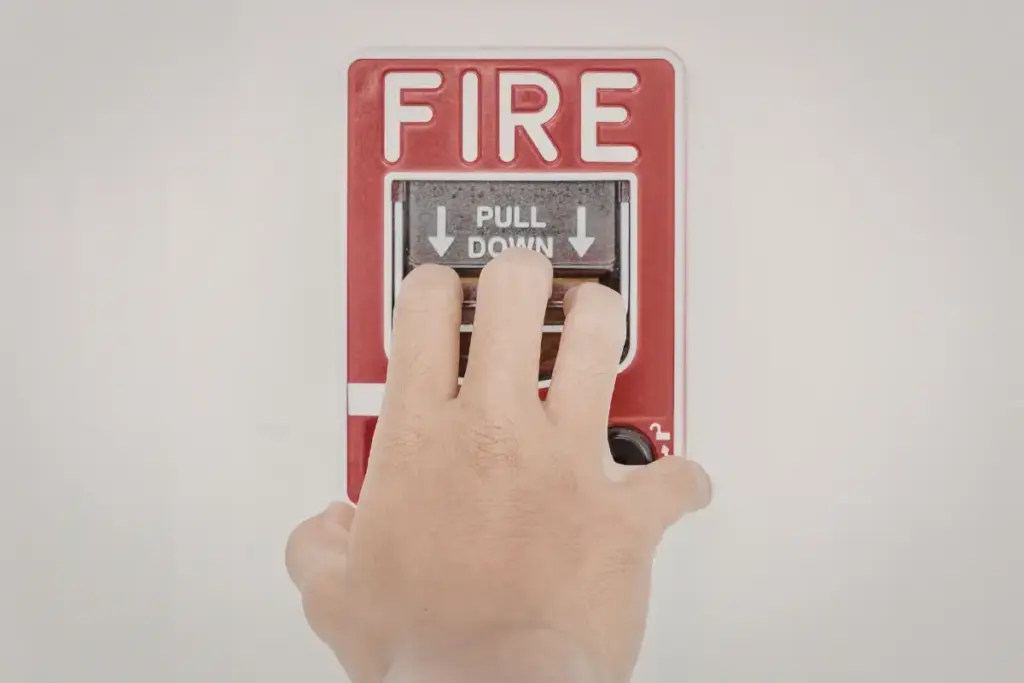
How to check a fire alarm? A fire alarm is safety-reliable when it sounds loudly on command, has stable power, and responds properly to smoke. Press the test button and listen for a loud, steady tone; silence, chirps, delays, or weak sound suggest a problem. Check the status light, confirm the unit is firmly mounted, and replace or reseat the battery if needed. For hardwired alarms, verify the breaker and guarantee that all interconnected units all sound. A quick smoke-aerosol test can confirm detection; more guidance is ahead.
Key Takeaways
- Press the test button monthly; a loud, steady alarm confirms that the horn and basic power are working.
- If you hear chirps, silence, or a weak sound, check battery placement, replace batteries, and ensure the alarm is firmly mounted.
- For hardwired alarms, confirm the breaker is on, the status light is steady, and interconnected units all sound during testing.
- Perform an occasional smoke test using approved smoke aerosol to verify the sensor, not just the alarm speaker.
- Replace alarms with delayed response, frequent false alarms, inconsistent results, or advanced age to avoid unreliable protection.
How to Test Your Fire Alarm in 60 Seconds
Press the test button and listen for the alarm. A working unit delivers a loud, steady tone within a second or two; silence, chirps, or a weak sound signals trouble. Note which alarms respond, then move to the next device so every room is covered in under a minute.
After the sound, check the power indicator light. Confirm the alarm is firmly mounted and not blocked by paint, dust, or a loose bracket. For battery models, open the compartment, verify the battery is seated correctly, and replace it if the unit hesitates or chirps. For hardwired models, confirm the breaker is on and that interconnected units also sound.
Finally, reset the alarm if needed and record the date. If the device is older than ten years, unreliable, or physically damaged, replacement protects independence and keeps choices in your hands.
Use the Test Button vs Smoke Test (What’s Enough?)
How to check a fire alarm? When is the test button enough, and when does a smoke test add value? The test button checks power, circuitry, and the horn, confirming the unit can alert without relying on a real hazard. For many homes, that’s the minimum proof that the alarm still “has a voice” and won’t leave occupants dependent on luck.
A smoke test adds value when confidence needs to extend beyond electronics into sensing performance. It helps reveal clogged vents, paint contamination, poor placement, or ageing sensors that still beep on command but react slowly to smoke.
A can of approved smoke aerosol is safer than open flame and respects a household’s right to self-direct risk.
- Use the test button to quickly verify alerting and battery integrity.
- Use smoke aerosol to confirm the sensor actually detects smoke.
- If results conflict, replace the unit rather than negotiate with uncertainty.
Set a Monthly Fire Alarm Test Schedule
Confidence in a fire alarm’s performance comes less from a one-time button or smoke check and more from repeating it on a predictable rhythm. A monthly schedule prevents safety from becoming a chore that keeps getting postponed. Picking a fixed day, such as the first Saturday, keeps the task autonomous and simple, without relying on anyone else’s reminders. The goal is consistency, not perfection: one quick test each month beats sporadic bursts of attention.
Each test should be logged in a notebook or phone note with the date, location, and result. For households, a brief heads-up avoids surprises and supports cooperation without creating dependency.
If the alarm is interconnected, the schedule should include confirming that the audible signal is heard where it matters most: bedrooms, hallways, and closed-door spaces. Renters can keep the same routine and share results with a landlord when needed.
Check Batteries and Power Before You Retest
How to check a fire alarm? A quick power check prevents a failed retest from being mistaken for a broken alarm. Before pressing the test button again, a homeowner should verify that the unit has stable power and a fresh battery. Many alarms chirp or flash to signal low power; ignoring those cues trades control for uncertainty
For hardwired models, a tripped breaker or a switched-off circuit can silently disable protection, even if the device appears fine.
- Verify the battery type and orientation, then replace it with a new, dated cell to avoid guessing later.
- Inspect the battery contacts for corrosion and gently clean them; poor contact can mimic a defective alarm.
- Confirm AC power where applicable: check the breaker, verify the alarm is firmly seated, and look for a steady status light.
Only after power is verified should retesting be trusted. This simple step keeps safety on one’s own terms rather than leaving it to chance.
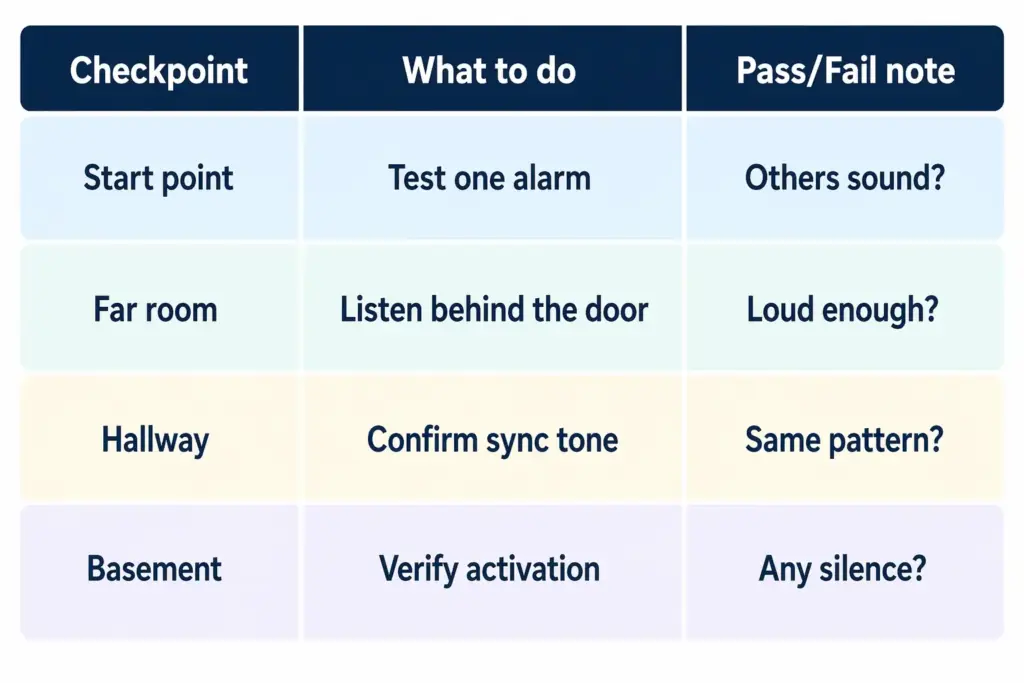
Test Interconnected Fire Alarms (Does Every Unit Sound?)
With stable power confirmed, the next check is whether interconnected smoke alarms communicate properly across the home. Press and hold the TEST button on one unit; within seconds, every linked alarm should sound. Walk the house and verify audibility in bedrooms, hallways, and closed-door areas. If any device remains silent, note its location and whether it is wired, wireless, or a combo smoke/CO device. A brand mismatch, an unpaired wireless link, a tripped interconnect wire, or an end-of-life chirp can break the chain. Restore independence from uncertainty by confirming whole-home coverage, not just a single beep in one room. If only the initiating unit sounds, consult the manual to re-pair or correct wiring, then retest until all units respond together.
Clean Your Fire Alarm So It Tests Correctly
Remove dust and debris so the alarm’s sensing chamber can “breathe” and respond accurately during a test. A clean unit is less likely to mistake harmless buildup for danger, and more likely to detect real smoke quickly.
Before cleaning, the homeowner should follow the manufacturer’s steps and, if hardwired, switch off power at the breaker to stay in control of the job.
- Vacuum gently: Use a soft brush attachment around vents and the perimeter to clear lint without forcing particles inside.
- Wipe the exterior: A dry microfiber cloth removes grime; avoid sprays, solvents, or soaking the casing, which can leave residue on sensors.
- Reset the space: Keep the alarm’s area clear of paint dust, heavy steam, and loose insulation; cleanliness protects autonomy by keeping safety systems dependable.
After reassembly, the unit can be tested promptly, ensuring the cleaning improved airflow and sensor performance.
Warning Signs Your Fire Alarm Is Failing (Chirps, Weak Sound)
Subtle signals, such as sporadic chirping, a noticeably weaker siren, or delayed response during a button test, often indicate a fire alarm is no longer operating reliably.
Chirps that persist after a fresh battery is installed can point to dirty contacts, a failing sensor, or internal electronics nearing the end of their tolerance. A siren that sounds thin, muffled, or inconsistent may reflect a clogged sounder, low voltage under load, or heat damage from past events.
Other red flags include random false alarms, frequent need for resets, or an indicator light that blinks in an unfamiliar pattern. Units that fall silent during scheduled interconnect tests, or that respond only after multiple button presses, may be struggling to communicate or power up.
If the alarm’s date label suggests advanced age, these symptoms deserve extra attention so the household stays in control rather than at the mercy of a flaky device.
Fire alarms showing these signs of failure should be turned off immediately and replaced or serviced to ensure they function properly in an emergency. It’s essential to address these issues promptly to maintain the safety of your property and occupants. Visit our blog how to turn off your fire alarm, if you face any emergency.
Replace a Fire Alarm That Won’t Test Reliably
Even if a fire alarm still powers on, it should be replaced if it cannot consistently pass a button test or responds only after repeated attempts. A hesitant test suggests failing sensors, weakened circuitry, or contaminated chambers, problems a fresh battery may not fix.
Reliability is the core promise; if the device cannot prove it on demand, it cannot be trusted when smoke arrives uninvited.
- Confirm the basics: install a new battery, reseat it firmly, and verify the unit is properly latched to its mount.
- Rule out environmental issues: clean vents with compressed air, move dust sources, and avoid placing near kitchens or bathrooms to prevent false triggers.
- Choose a decisive replacement: pick a model that meets current standards, matches the power type (battery/hardwired), and consider interconnected alarms for faster, independent action.
Replacing a stubborn unit restores control over home safety and protects the freedom to sleep without doubt. Visit our fire alarm service to get it replaced.
Frequently Asked Questions
How Many Smoke Alarms Do I Need for My Home’s Layout?
Most layouts require one smoke alarm in every bedroom, one outside each sleeping area, and one on every level, including basements; add units in long hallways and larger homes. Interconnect alarms and choose placement freely.
Where Should I Install Alarms in Kitchens to Avoid False Triggers?
Install a smoke alarm 10–12 feet from cooking appliances, ideally on the ceiling and away from vents. Use a photoelectric or heat alarm in kitchens. Keep it clear of steam sources and follow local codes.
Can I Paint Over a Smoke Alarm or Cover It During Renovations?
It should not be painted over or covered; doing so can disable sensing and violate codes. During renovations, it should be removed, capped per instructions, then reinstalled or replaced to preserve independent, reliable detection.
Do Smoke Alarms Detect Carbon Monoxide, or Do I Need a Separate Detector?
Most smoke alarms do not detect carbon monoxide; a separate CO detector is typically needed, unless a listed combo unit is installed. For autonomy and safety, they verify that all device labelling is correct and test regularly.
What Fire Alarm Standards or Certifications Should I Look for When Buying?
Look for recognised certifications: UL 217 for smoke alarms, UL 268 for system detectors, and UL 2034 for carbon monoxide units; in Canada, CSA marks. Prefer NFPA-compliant devices with interconnect, hush feature, and clear labelling.
Conclusion
How to check a fire alarm? Regular testing keeps fire alarms dependable when seconds matter. A quick press of the test button confirms basic operation, while routine battery and power checks prevent surprise failures. Interconnected alarms should be verified so that every unit sounds, and gentle cleaning helps sensors work accurately. Persistent chirping, weak volume, or inconsistent results signal a problem that should not be ignored. If an alarm will not test reliably or is past its service life, replacement is the safest choice.