
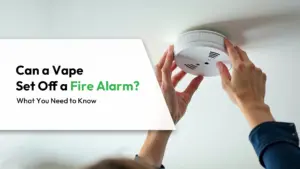

To remove a fire alarm cover, the user should first identify whether it’s twist-on, clip-on, or hinged, and shut off power to hardwired units. A step stool, a non-metallic prying tool, and small screwdrivers are helpful. Twist circular covers counterclockwise; press or pinch marked tabs on clip-on or hinged models. Support the cover to prevent dropping. Once off, gentle cleaning and careful reattachment restore proper function, and further steps can make the process even safer and easier.
Key Takeaways
- Identify your alarm type (smoke, heat, combo) and cover style (twist-on, clip-on, hinged) by checking labels, arrows, or “OPEN/LIFT” markings.
- Turn off the power to hardwired alarms, use a stable ladder, and wear eye protection to avoid accidents and falling debris.
- For twist-on covers, support the unit, then gently rotate counterclockwise while pressing slightly inward until it releases.
- For clip-on or hinged covers, press or pull the marked tab(s) while supporting the cover, then carefully swing or lift it away.
- After cleaning with a soft brush or compressed air, realign and securely reattach the cover, restore power, and test the alarm button.
Identify Your Fire Alarm and Cover Type
A successful cover removal begins with correctly identifying the alarm and its housing. The person should first decide whether the device is a smoke detector, a heat detector, or a combined alarm. This is usually printed on the front or side of the unit, sometimes with a model number. Recognising the device type helps predict how the cover is held in place. Next, the observer notes the cover design. Common styles include flat twist-off plates, hinged fronts, and protective cages in public areas.
Circular ceiling units often twist counterclockwise from a mounting base, while rectangular wall units may clip or latch at one edge. Vandal-resistant covers typically appear thicker, with visible hinges or a shaped guard. Labels such as “Lift Here” or small arrows may indicate the direction of movement.
Carefully examining these visual cues allows the person to plan removal without forcing components or damaging the alarm.

Gather the Right Tools and Safety Gear
Some basic tools and simple safety gear make fire alarm cover removal safer and easier. Before anyone begins, they should gather a stable step stool or ladder tall enough to reach the alarm comfortably. A non‑metallic tool, such as a plastic putty knife or plastic pry tool, helps avoid scratching the cover or contacting internal components. A small Phillips and flat‑head screwdriver are useful if the cover is secured with visible screws.
Safety gear matters even for this small task. Safety glasses protect the eyes from falling dust, insects, or loose plastic. A dust mask or simple respirator is recommended in older buildings where ceiling dust may be significant.
Light work gloves can improve grip and help prevent minor cuts from sharp edges on older covers or ceiling surfaces. Finally, keeping a flashlight or headlamp nearby guarantees the person can clearly see release tabs, screw heads, and any printed instructions.
Remove a Twist-On Fire Alarm Cover
To remove a twist‑on fire alarm cover, the person should first confirm the alarm is indeed a twist‑lock style by looking for a circular base and small alignment arrows or icons around the edge.
After visually confirming this, they should make sure power to the alarm is safely shut off according to manufacturer guidance or local rules. Learn How To Turn Off Fire Alarm.
Next, the person supports the alarm with one hand to prevent it from dropping.
With the other hand, they grip the outer edge of the cover and gently rotate it in the direction indicated by the arrows, usually counterclockwise. A slight resistance is normal as the locking tabs disengage. If the cover feels stuck, the person can slightly wiggle it while maintaining rotational pressure, avoiding forceful prying that could crack the plastic. Once the tabs release, the cover will drop slightly and can be carefully lowered to expose the internal components.
Remove Clip-On or Hinged Fire Alarm Covers
Unlike twist‑on models, many modern alarms use clip‑on or hinged covers that release from one side instead of rotating off. To remove these, a person first looks closely at the rim of the cover for small tabs, arrows, or “PUSH/OPEN” markings. These indicators usually show which edge will release.
They then support the alarm with one hand and gently press, pinch, or pull the marked tab with the other. The cover should pop free on that side and swing down or lift away. Force is rarely needed; steady, even pressure works best and reduces the risk of cracking the plastic.
Key points to notice include:
- Location and number of clips around the edge
- Any printed arrows or “OPEN” symbols
- Whether the cover hinges from the top, side, or bottom
- How far the cover will swing once unclipped
- Keeping one hand under the cover to prevent dropping
Fix Stuck or Painted-Over Fire Alarm Covers
Stuck or painted-over fire alarm covers often need extra care before they will release safely. When paint bridges the gap between the cover and the base, forcing it can crack the plastic or disturb the mounting bracket. A careful, step‑by‑step approach helps loosen the bond without damaging the alarm.
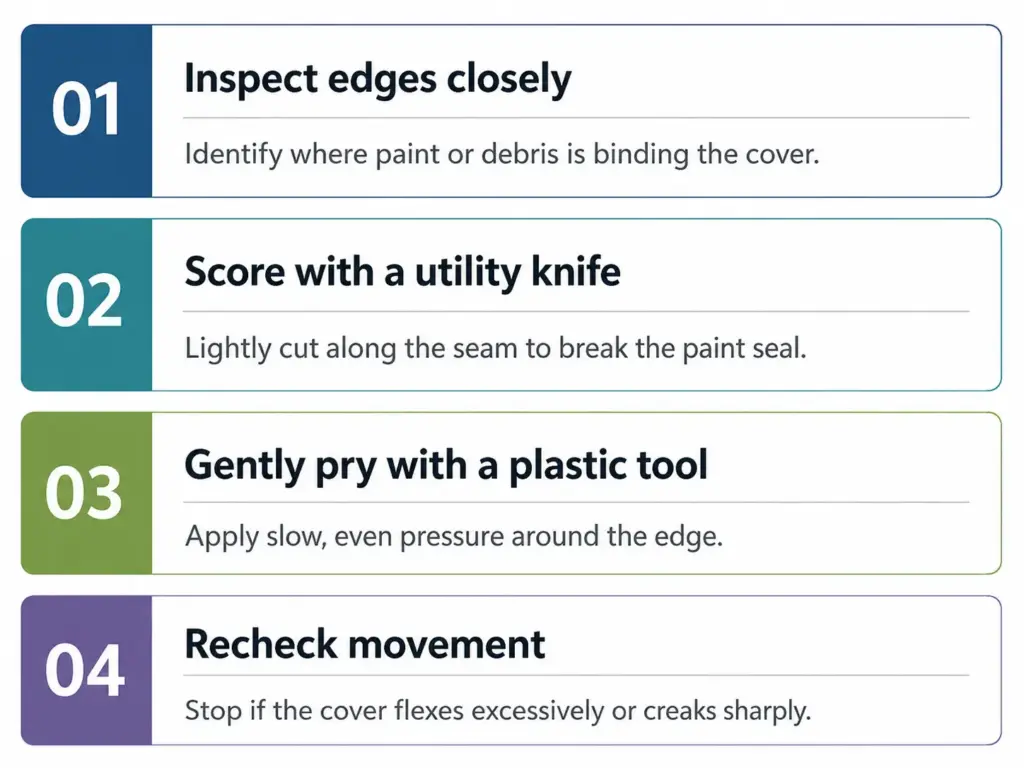
A thin, sharp blade should be guided shallowly, so it touches only the paint film, not wiring or inner parts. A plastic putty knife or an old credit card limits scratching. If resistance remains after several passes, the cover should be left in place and evaluated for replacement instead of being forced free.
Safely Remove a Hardwired Fire Alarm
Safely removing a hardwired fire alarm requires more caution than dealing with a battery‑only unit, because it is connected directly to household wiring.
The homeowner should begin by switching off power at the circuit breaker that controls the alarm circuit, then confirming the power is off using the test button or a non‑contact voltage tester. The alarm body usually twists or slides off its mounting plate. Once loosened, it will hang by a wiring harness. The person should support the alarm with one hand while inspecting the wiring connections with the other.
Key steps to keep in mind include:
- Turn off the correct circuit breaker and label it.
- Verify power is off before touching any wires.
- Gently disconnect plug‑type connectors, if present.
- If wire nuts are used, carefully unscrew them and separate wires.
- Keep the mounting bracket and screws if the alarm will be replaced.
Clean Inside the Fire Alarm Cover Safely
Once the cover is off and power is confirmed off, the interior of the fire alarm should be cleaned methodically to avoid damaging its sensitive components. The person begins by visually inspecting the alarm’s chamber, vents, and sensor area for dust, cobwebs, or insect debris. Instead of blowing into the unit, which can push particles deeper inside, a soft brush or a can of compressed air is used in short, controlled bursts.
They hold the can upright and keep the nozzle a safe distance from the circuitry, moving side to side rather than concentrating air in one spot.
If the manufacturer allows, a slightly damp, lint‑free cloth may be used to wipe non-electronic plastic surfaces only, staying away from the sensor and wiring. No liquid cleaners, sprays, or solvents are applied inside the unit, as residues can interfere with smoke detection and corrode electrical contacts. Explore the Top 5 Components of a Fire Alarm System.
Reattach the Fire Alarm Cover and Test
After the interior is clean and dry, the cover is aligned with the mounting plate or base, making sure any tabs, hinges, or guide marks are properly seated.
The person then presses the cover gently but firmly into place, listening and feeling for a click or snap that indicates a secure fit. If screws are present, each is tightened evenly, without over‑torquing, to avoid warping the cover or damaging the housing. With the cover reattached, power is restored following the manufacturer’s instructions. The individual then performs a functional test, typically by pressing the built‑in test button until the alarm sounds. This confirms both electrical power and sensor readiness.
To keep the reader engaged, this stage emphasises:
- Confirming a flush, wobble‑free fit
- Ensuring all fastening points are engaged
- Restoring power in the correct sequence
- Using the test button to verify operation
- Noting the alarm’s normal indicator lights
Common Fire Alarm Cover Mistakes to Avoid
Many fire alarm issues stem from simple cover‑related mistakes that are easy to overlook. People often pry the cover off with sharp tools, leaving cracks that later allow dust and insects to infiltrate the sensor. Others twist or pull too hard, snapping plastic tabs so the cover never seats securely again. These errors may seem minor, yet they quietly reduce the system’s reliability.
Neglect is another frequent problem. After maintenance, some individuals forget to reinstall the cover completely, leaving gaps that interfere with proper detection or allow accidental activation. Painting over the cover is equally risky, blocking vents and test buttons.
| Mistake | Hidden Risk | Possible Outcome |
| Forcing the cover | Internal damage | False alarms |
| Using the wrong tools | Cracked housing | Costly replacement |
| Leaving gaps | Dust buildup | Late detection |
| Painting the cover | Blocked sensors | Alarm failure |
| Skipping inspection | Unnoticed wear | Reduced safety margin |
Frequently Asked Questions
Can I Remove a Fire Alarm Cover in a Rented Apartment Without Landlord Permission?
No, they generally should not remove a fire alarm cover without the landlord’s permission. Doing so can violate lease terms, local safety laws, and insurance rules; instead, they should report issues or nuisance alarms to the landlord or property manager.
How Often Should I Remove the Cover to Inspect or Clean My Fire Alarm?
They should remove the cover for inspection or gentle cleaning about once every six months. More frequent checks may be needed in dusty, smoky, or high‑humidity environments, always following manufacturer instructions and any building or landlord requirements.
Are There Legal Regulations About Tampering With Fire Alarm Covers in Shared Buildings?
Yes. In many regions, tampering with fire alarm covers in shared buildings is prohibited by fire codes and building regulations, often carrying fines or criminal penalties. Individuals should consult local laws and building management before making any changes.
Can Removing the Cover Temporarily Affect My Home Insurance Coverage or Claims?
Yes, it can. Insurers may view disabling or removing fire protection as negligence or a policy violation. This could reduce payouts, deny claims, or void coverage. Policy documents and insurer guidance should be checked before altering safety devices.
What Should I Do if My Fire Alarm Cover Is Missing or Broken Altogether?
They should replace the missing or broken cover immediately, following the manufacturer’s instructions and checking model compatibility. Until fixed, they must test the alarm regularly, document the issue, and notify landlords or insurers if required by lease terms or policy conditions.
Conclusion
By following these simple steps, anyone can safely remove, clean, and replace a fire alarm cover without damaging the device or compromising home safety. Understanding the alarm type, using the right tools, and handling hardwired units carefully helps prevent accidents and false alarms. With the cover reattached and the system tested, the alarm can continue to function properly, providing reliable protection and peace of mind throughout the home.